How to Set Up a Golf Launch Monitor at the Range (Step-by-Step)

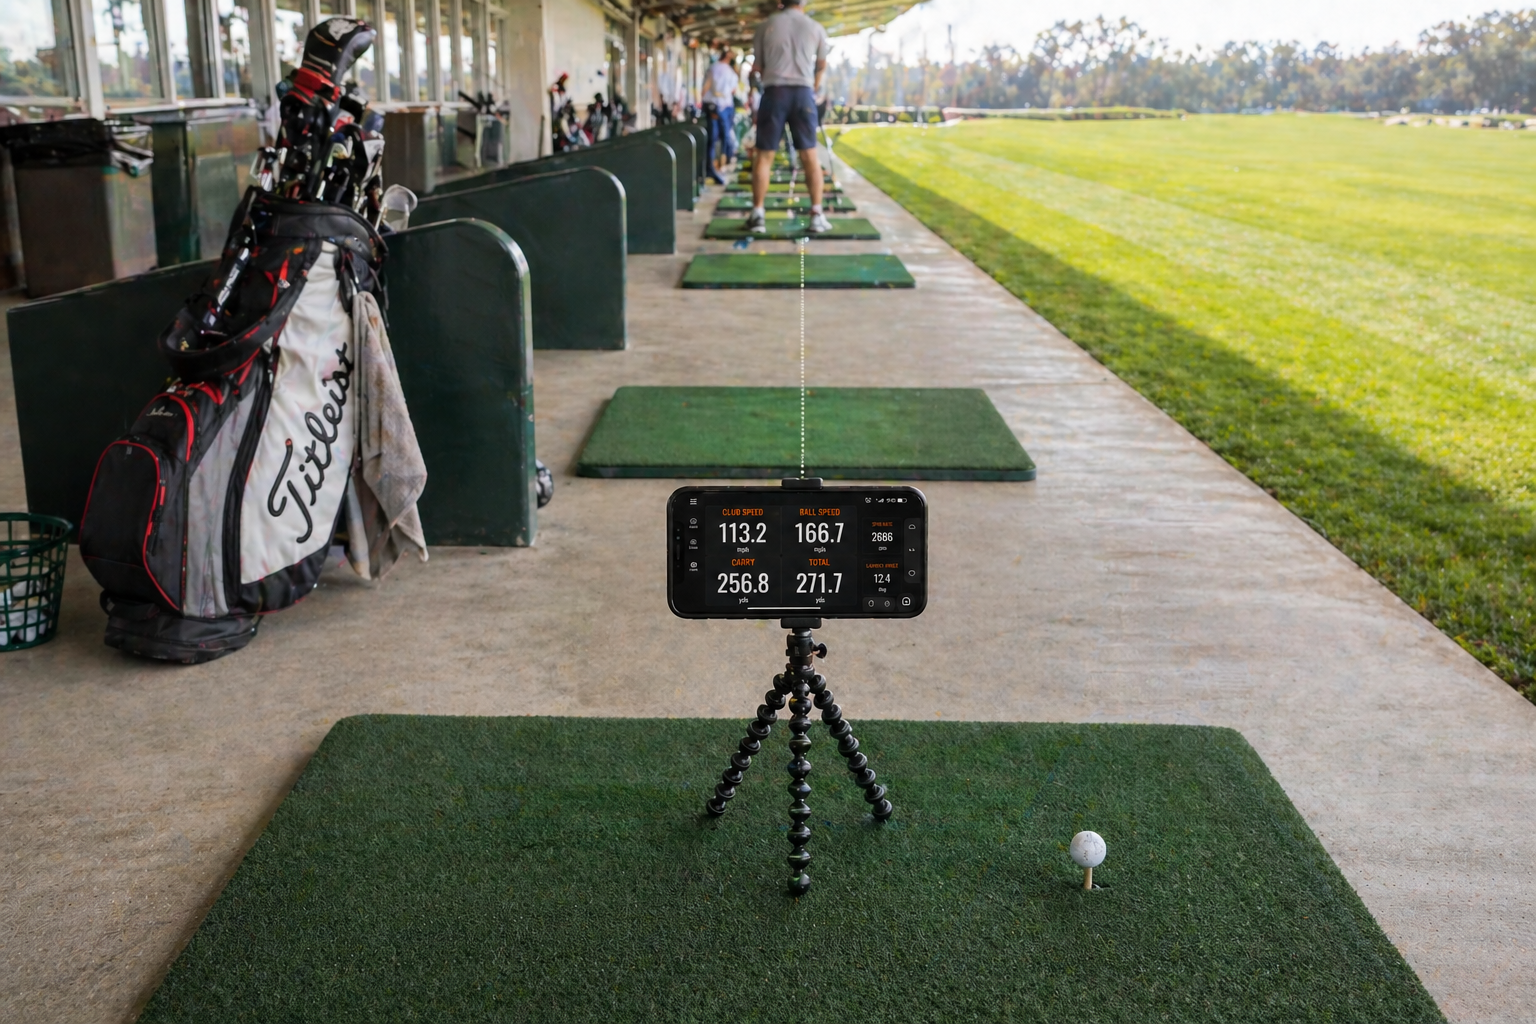
How to Set Up a Golf Launch Monitor at the Range (Step-by-Step)
Bringing a launch monitor to the driving range is one of the fastest ways to turn a bucket of balls into a real practice session. But a poor setup means inaccurate data — and inaccurate data is worse than no data at all, because it sends your practice in the wrong direction.
This guide covers exactly how to set up a golf launch monitor at the driving range — specifically using the Golf Launch Monitor app on your iPhone — so that every reading you get is something you can actually trust and act on.
No launch monitor hardware? No problem.
The Golf Launch Monitor app turns your iPhone into a professional-grade launch monitor. Ball speed, club head speed, launch angle, spin rate, carry distance, and shot dispersion — all from your iPhone camera at the range.
Download Free on App Store See all featuresWhat you need before you arrive at the range
A good range session with launch monitor data starts before you leave the house. Make sure you have the following sorted before you head out:
- iPhone with the Golf Launch Monitor app already downloaded and opened at least once
- A compact tripod — a flexible gorilla-style tripod works perfectly and fits in a golf bag side pocket
- Your phone charged to at least 50% (tracking sessions use significant battery and processor power)
- Your own golf balls if the range allows — premium balls give cleaner tracking data than worn range balls
- A clear idea of what you are there to work on — launch monitor data is most useful when you arrive with a specific goal
Tripod recommendation: A flexible mini tripod like the Joby GorillaPod wraps around your golf bag, a fence rail, or sits flat on the ground without any fuss. It costs around $25–30 and is the single most useful accessory for iPhone launch monitor sessions.
Choosing the right bay at the range
Not all driving range bays are equal for launch monitor setup. A couple of minutes choosing the right spot will save you frustrating inaccuracies.
Look for a bay with clear space behind the mat
The app's camera needs to be placed 6–8 feet directly behind you along your target line. If there is a wall, a divider, or a neighbouring bay too close behind you, you will not have room to position the phone at the right distance. End bays or bays with extra rear space are ideal.
Consider the sun direction
Bright, even light is good. Direct sunlight pointing straight into the camera is a problem. It washes out the ball in frame and reduces the contrast the computer vision model needs for accurate tracking. If possible, choose a bay where the sun is to the side or behind the camera, not in front of it.
Avoid mats with strong surface textures directly behind the ball
Some range mats have bold grid lines or markings around the tee area. While this rarely causes issues, a plain mat surface behind the ball gives the tracking algorithm a cleaner background to work against.
Step-by-step: setting up your iPhone launch monitor at the range
Step 1
Place the ball and establish your target line
Tee up or set your ball first. Your entire setup flows from the ball position, so get this right before you position anything else. Stand behind the ball and pick a target — this is your target line, and your phone needs to sit directly on it, behind you.
Step 2
Set up your tripod 6–8 feet directly behind the ball
Walk back from the ball along your target line and place the tripod at 6–8 feet. The phone should face forward toward the ball and beyond — down your target line. Height should be between knee and hip level. Do not place it off to the side; it must be directly in line with the ball and target.
Step 3
Open the app and switch to landscape orientation
Open the Golf Launch Monitor app and rotate your phone to landscape mode. Landscape gives a wider field of view, which means the app can track the ball for more frames before it exits the frame — giving you more accurate speed and angle calculations.
Step 4
Check the live preview frame
Before you hit anything, look at what the camera sees. The ball should be clearly visible, sitting roughly in the centre of the frame with open space in front of it in the direction of your target. If the ball is cut off or too close to the edge, adjust the tripod position — move it back slightly or raise it a little.
Step 5
Do a test swing (without hitting) to check for interference
Take a practice swing and watch whether your body or club passes through the camera's line of sight at any point. If your body blocks the ball at impact from the camera's perspective, shift the tripod slightly to the side — just enough to get a clean view of impact, while still staying roughly on the target line.
Step 6
Hit your first shot and verify the reading
Take a normal swing — not a half swing to "test" it. The app is designed for real swings. After impact, the results screen will show your ball speed, club head speed, launch angle, spin rate, and carry distance. If the reading looks wildly off or shows zero, see the troubleshooting section below before continuing.
Step 7
Lock in your setup and start your session
Once your first reading looks reasonable, do not move the tripod again. The app calibrates its understanding of your setup based on the first few shots. Moving the phone mid-session resets that context and can introduce inconsistency into the data.
Changing clubs? You do not need to re-setup when switching clubs. The camera position stays the same regardless of whether you are hitting driver, irons, or wedges. Just make sure the ball is in the same position relative to the camera when you re-tee.
Ideal setup distances for different scenarios
The 6–8 foot recommendation is the sweet spot for most range bays. Here is how to adjust depending on your situation:
| Scenario | Recommended phone distance | Notes |
|---|---|---|
| Standard outdoor range bay | 6–8 feet | Default setup — works for all clubs |
| Covered or low-ceiling bay | 6–7 feet | Keep phone lower to maintain ball in frame |
| Limited rear space (wall behind) | 5–6 feet | Move phone to minimum 5ft, accept slightly reduced accuracy |
| Indoor net at home | 6–8 feet | Net should be at least 8ft in front of the ball |
| Wedge/short iron practice | 6–7 feet | Ball flight is shorter — keep phone closer to capture more of the arc |
How to structure your range session around the data
Having a launch monitor at the range is only useful if you have a plan for the data it gives you. Here is a simple structure that works well:
First 10 shots — establish your baseline
Hit 10 shots with the same club without trying to change anything. Just swing normally. This gives you an honest picture of where you are right now: your average ball speed, typical launch angle, and shot dispersion. Write these numbers down or screenshot the session summary.
Next 20–30 shots — work on one variable
Pick one thing to adjust based on what the data showed. If your launch angle is too low, focus on ball position and tee height. If your spin is too high, work on shallowing your angle of attack. Change only one variable — if you change three things at once, you will not know which one moved the needle.
Final 10 shots — verify the change
Return to your normal swing with the adjustment in place. Are the numbers moving in the right direction? Is carry distance increasing? Is dispersion tightening? The app's session view shows you the full spread of readings, making it easy to compare your final 10 shots against your opening baseline.
Export your session: The Golf Launch Monitor app lets you export your full session data as a PDF or CSV file. Saving your session after every range visit builds a performance history you can actually track over weeks and months.
Troubleshooting: when readings look wrong
Reading shows zero or no data
The ball was not visible in frame at the moment of impact. Check that the ball is clearly centred in the live preview before the next shot. Most often this means the phone is positioned slightly off-axis — nudge the tripod left or right a few inches until the ball sits clearly in centre frame.
Ball speed looks wildly high or low
This usually means the phone moved during the swing — either from wind, vibration from a nearby player, or an unstable tripod. Make sure the tripod is on a flat, firm surface and that no external movement can disturb it mid-swing.
Readings are inconsistent shot to shot
Some shot-to-shot variation is normal — your swing is not a machine. But if readings are swinging wildly (e.g. ball speed jumping from 110 to 160 mph between similar shots), the issue is usually lighting. Strong shadows moving across the mat, or a camera pointed into intermittent direct sunlight, introduces noise into the tracking. Reposition to more stable lighting conditions.
Launch angle seems too high or too low across all shots
Check that your phone is level. If the tripod is on an angled surface or tilted forward, the camera's reference frame is skewed and will report systematically off launch angles. Use your phone's built-in level (or the camera's gridline feature) to confirm the phone is sitting flat.
Important: Never move the tripod between shots while in the middle of a session. The app builds its spatial understanding incrementally. Moving the camera resets this and makes the readings from before and after the move incomparable.
Your next range session, done right
A well-set-up launch monitor at the range turns every ball you hit into a data point. You stop guessing whether the change you made is working and start knowing. That shift — from feeling-based practice to data-driven practice — is what separates golfers who improve steadily from those who plateau.
The Golf Launch Monitor app is built for exactly this kind of session. It tracks ball speed, club head speed, launch angle, spin rate, carry distance, and shot dispersion — all from a single iPhone, with no additional hardware to carry to the range or set up.
Bring real data to your next range session — for free.
Download the Golf Launch Monitor app, grab your tripod, and spend your next bucket of balls actually understanding your swing — not just hitting it.
Download on the App Store Learn moreFrequently asked questions
How far behind the ball should I place my launch monitor at the range?
For the Golf Launch Monitor app, the ideal position is 6–8 feet directly behind the ball along your target line, at roughly hip height. This gives the camera enough time to track the ball from impact across multiple frames before it exits the field of view.
Can I use a launch monitor app at a covered driving range?
Yes. Covered ranges work well as long as the lighting is consistent and reasonably bright. Avoid bays where harsh artificial lighting creates strong shadows across the impact zone, as this can reduce tracking accuracy. Most modern covered ranges are well-lit enough for reliable readings.
Do I need to set up differently for irons vs. driver?
The camera position stays the same for every club. The only thing that changes between clubs is the ball position in your stance — which the app handles automatically. You do not need to re-position the tripod when switching from driver to irons to wedges.
Can other golfers in adjacent bays interfere with my readings?
Rarely. The app tracks your specific ball from impact — it is not a radar device that picks up all movement in its cone. However, if a neighbouring golfer's shot passes directly through your camera frame at the same moment you hit, it can occasionally confuse the tracking. An end bay removes this risk entirely.
How many shots should I hit before trusting the data?
Treat the first shot as a setup verification — check that the reading looks plausible and that the framing is correct. From shot two onward, the data is usable. For any meaningful baseline measurement, use an average of at least 8–10 shots with the same club.
Does the Golf Launch Monitor app work on all iPhones?
The app requires iOS 17.6 or later. It works best on iPhone 8 and newer. Newer models (iPhone 12 and above) produce the most consistent readings due to their improved camera sensors and processing power.
how to set up golf launch monitor at rangegolf launch monitor setupdriving range launch monitoriPhone golf launch monitorgolf launch monitor positioninggolf range data applaunch monitor tipsgolf tracking app setup