How to Reduce Wood Waste When Cutting Plywood

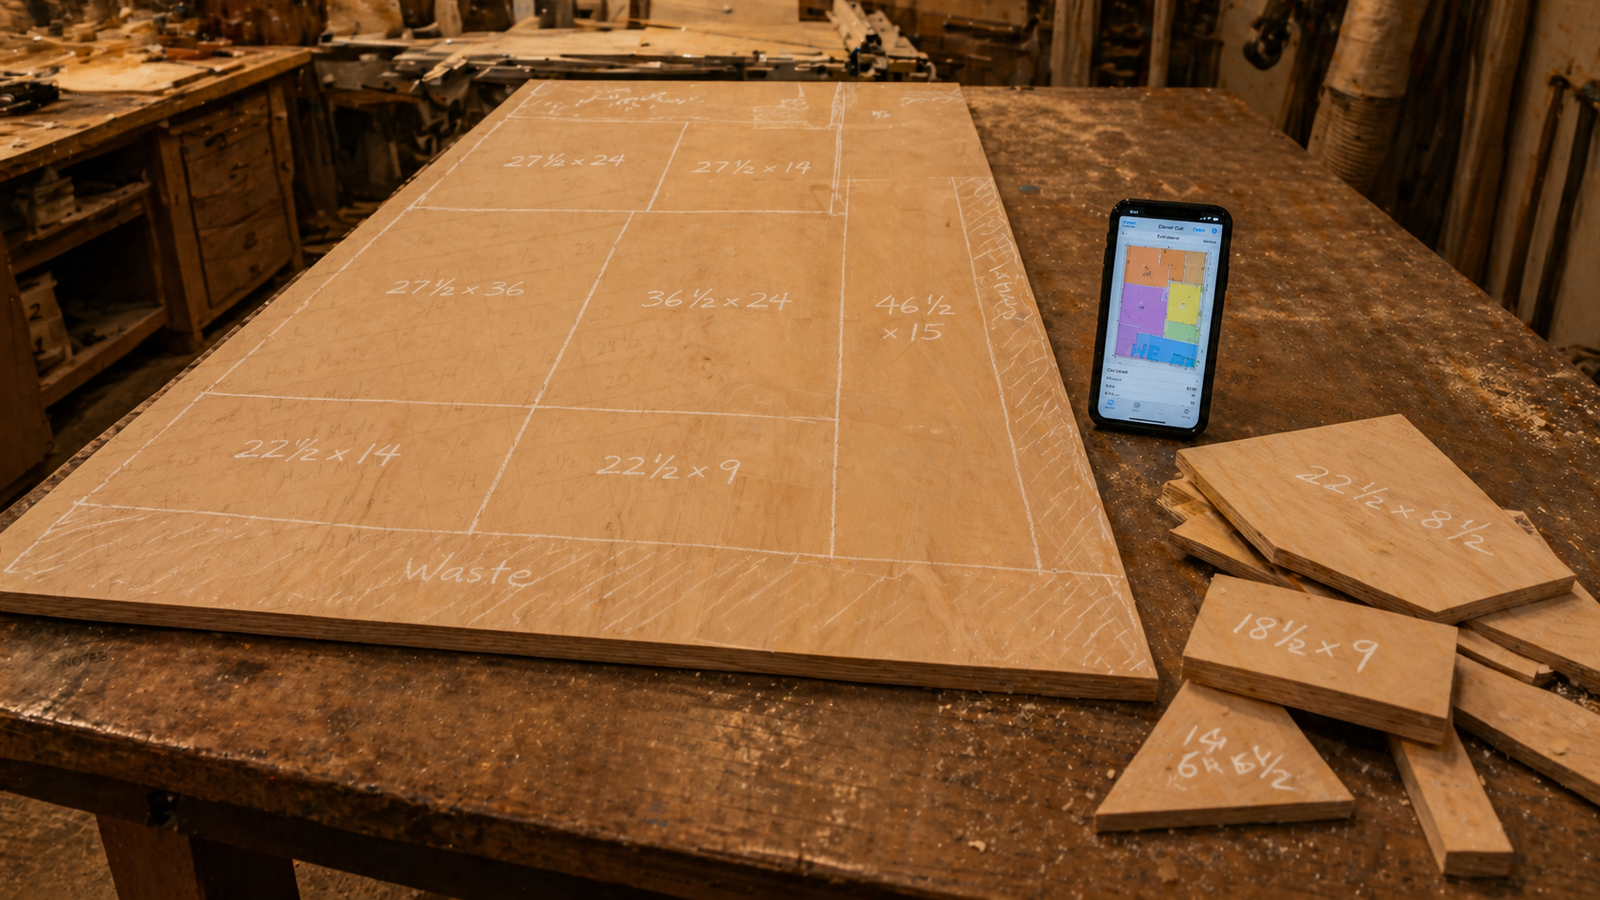
How to Reduce Wood Waste When Cutting Plywood
Plywood is one of the most expensive materials in any woodworking project — and one of the easiest to waste. A single poorly planned cut on a full 4×8 sheet can render a large offcut unusable, adding an unnecessary extra sheet to your material bill. Whether you're building kitchen cabinets, shop furniture, or a simple set of shelves, reducing plywood waste starts before you ever switch on the saw. In this guide, you'll learn the practical strategies that professional cabinet makers and experienced DIYers use to get more usable parts from every sheet — including how a cut list optimizer can do the heavy mathematical lifting for you.
🪵 Stop Wasting Plywood — Optimize Your Cuts on iPhone
Cut Optimizer automatically arranges your parts on stock sheets for minimum waste. Enter your parts, hit Calculate, and get a step-by-step cutting guide with waste statistics in seconds.
Why Plywood Waste Is a Bigger Problem Than Most Woodworkers Realise
Studies and tool benchmarks consistently show that woodworkers who plan their cuts manually — on graph paper, in their head, or using rough sketches — waste between 15% and 25% of their sheet material on average. On a kitchen cabinet project requiring ten sheets of 18 mm birch plywood at $65 per sheet, that translates to $97–$162 of material going straight into the offcut bin. A well-optimised cutting plan routinely brings waste below 8–10%.
The cause isn't carelessness — it's mathematics. Efficiently nesting irregular rectangular parts onto a fixed sheet size is an NP-hard computational problem. The human brain simply isn't equipped to find the optimal arrangement across dozens of parts and multiple sheets. That's precisely what a cut list optimizer app is built to solve.
1. Always Plan Your Cuts Before You Buy the Plywood
The single most effective way to reduce plywood waste is to complete your cutting plan before purchasing material. Most hobbyists buy sheets based on a rough estimate ("I think I'll need about four sheets") and then cut reactively. This almost always leads to buying more sheets than necessary — or cutting the first sheet in a way that makes efficient use of the second sheet impossible.
Instead, build your complete cut list first — every part, with finished dimensions, quantities, material type, and thickness — then run it through an optimizer to find out exactly how many sheets you need. You'll often discover that what seemed like a four-sheet job fits comfortably on three, or that a slightly different part size drops you from five sheets to four.
💡 Pro Tip: Run your optimizer before going to the lumber yard, not after. Knowing your exact sheet count lets you buy precisely what you need — no emergency return trips, no leftover sheets taking up wall space for months.
2. Use a Cut List Optimizer — Not Graph Paper
Graph paper cut planning is a woodworking tradition, but it has a fundamental limitation: you can only evaluate the layouts you think to draw. An experienced woodworker might test three or four arrangements and pick the best one. A 2D bin-packing algorithm tests thousands of arrangements in under a second and picks the mathematically optimal solution.
The Cut Optimizer app for iPhone and iPad uses exactly this approach. You enter your parts list — dimensions, quantities, grain direction, material — define your stock sheets, set your saw kerf, and tap Calculate. The result is a colour-coded cutting diagram for each sheet, a waste percentage breakdown, and a step-by-step cutting guide to follow at the saw. The time investment is typically under five minutes, and the material savings on a mid-size cabinet project regularly justify the effort on the first sheet alone.
3. Account for Saw Kerf in Every Layout
Saw kerf — the material removed by the blade during each cut — is one of the most commonly overlooked sources of plywood waste. A standard 10" table saw blade removes approximately 3 mm (⅛") of material per pass. That sounds negligible, but consider a sheet broken down with 12 rip cuts and 8 crosscuts: you're losing 60 mm (nearly 2.5") of material to kerf on that sheet alone.
When planning cuts manually, most woodworkers forget to account for kerf between parts, resulting in final pieces that come out slightly undersized — or a layout that looked like it would fit on two sheets but actually requires a third. The Cut Optimizer has a dedicated kerf field — enter your blade thickness once and every spacing calculation in the layout is automatically adjusted.
| Saw / Blade Type | Typical Kerf | Lost per 10 Cuts |
|---|---|---|
| Standard table saw blade | 3 mm (⅛") | 30 mm (1.2") |
| Thin-kerf table saw blade | 2.4 mm (3/32") | 24 mm (0.95") |
| Track saw / circular saw | 2.5–3 mm | 25–30 mm |
| CNC router (¼" bit) | 6.35 mm (¼") | 63.5 mm (2.5") |
4. Allow Part Rotation Where Grain Direction Doesn't Matter
Grain direction is critical on visible surfaces — cabinet fronts, furniture tops, and door panels all need the face veneer running in a specific direction for aesthetic consistency. But a large proportion of parts in any project are hidden or structural: cabinet backs, drawer bottoms, internal shelves, subfloor panels. On these parts, grain direction is irrelevant.
Allowing the optimizer to freely rotate grain-insensitive parts typically reduces waste by 5–15% compared to locking all parts in a fixed orientation. In the Cut Optimizer app, you can set grain direction per part — locking it for visible pieces and leaving it free for structural ones. The optimizer then uses this flexibility to nest parts more efficiently across the sheet.
💡 Pro Tip: Before finalising your cut list, review each part and honestly ask: does grain direction actually matter here? A drawer bottom inside a closed cabinet does not need grain-locked orientation. Freeing up these parts for rotation can save you an entire sheet on a large project.
5. Add Your Offcuts as Stock Before Buying New Sheets
Most active woodworkers accumulate a collection of plywood offcuts from previous projects — pieces that are too large to bin but awkward to use without planning. These offcuts represent paid-for material that often goes to waste simply because it's inconvenient to work around.
A cut list optimizer solves this elegantly. In the Cut Optimizer, you can add offcuts as stock panels alongside full sheets and set priority levels so the optimizer uses up existing material before opening new sheets. This alone can eliminate the need for one or more full sheets on medium-sized projects, turning otherwise-wasted offcuts into valuable project material.
Before running any optimization, spend five minutes measuring your offcut stack and adding every usable piece. The time invested almost always pays off in material saved.
6. Cut Large Pieces First
This is one of the oldest rules in woodworking — and it's still the right approach. When breaking down a full sheet, always cut your largest parts first. This keeps the sheet stable and manageable throughout the process, and it ensures that the largest offcuts are correctly oriented for smaller parts later.
Cutting small parts first leaves you with awkward, difficult-to-handle remnants and often produces offcuts that are too narrow or too short to yield your remaining large parts. A cut list optimizer app that generates a step-by-step cutting guide already sequences your cuts in the optimal order — so you don't have to think about it at the saw.
7. Trim the Factory Edge Before Cutting Parts
Plywood factory edges are rarely perfectly straight or square. Most sheets have at least minor bowing, and some have significant defects along the long edges from stacking and handling. If you cut parts directly from an untrimmed factory edge, small deviations accumulate across multiple cuts — producing parts that are slightly out of square and gaps that won't close cleanly in assembly.
Professional practice is to trim a small amount — typically 5–10 mm — from one long edge and one short edge of each sheet before cutting parts. This gives you two true reference edges to work from. In your cut list optimizer, set a trim allowance in the stock panel settings to account for this so the layout doesn't try to use the full nominal sheet dimension.
⚠️ Warning: Skipping the factory edge trim on appearance-grade plywood is a false economy. A single out-of-square reference edge propagates error through every subsequent cut on that sheet. The 10 mm you save in material costs far less than remade parts.
8. Group Parts by Material and Thickness
When a project involves multiple material types — say, 18 mm plywood for carcasses, 12 mm plywood for drawer boxes, and 6 mm hardboard for backs — it's tempting to mix optimisation across all of them in one pass. This is a mistake. Never place parts of different thicknesses on the same stock sheet, and always keep material types separate.
The right approach is to group your cut list by material and thickness, then optimise each group independently. A good cut list calculator app handles this automatically by matching parts to stock sheets of the correct material — but only if you've correctly assigned material types to each part and each stock panel.
9. Use Thin-Kerf Blades on Expensive Sheet Goods
On projects with high-value material — hardwood plywood, figured veneer, or premium melamine — switching from a standard blade (3 mm kerf) to a thin-kerf blade (2.4 mm) makes a measurable difference over a full cutting session. The saving per cut is small, but across 30–40 cuts on a 10-sheet project, you recover nearly 20 mm of material — close to a full part's width on some layouts.
Thin-kerf blades also produce less tear-out on veneered surfaces when used with a zero-clearance insert, reducing the number of parts you need to recut due to edge damage. Enter your actual blade kerf into your cut list optimizer — whether 2.4 mm or 3 mm — so the cutting layout reflects your specific setup.
10. Plan Complementary Parts Together
Some projects have parts whose dimensions naturally complement each other — a wide shelf offcut is exactly the right width for a set of drawer sides, for example. Identifying these complementary relationships before optimising can unlock layouts where one part's offcut becomes another part's stock.
This is another area where an optimizer excels over manual planning. By entering all parts from a project simultaneously — rather than optimising one sheet at a time — the software can find cross-sheet complementary arrangements that a human planner would almost never identify. The Cut Optimizer app treats the entire parts list as a single optimisation problem, which is exactly why its waste percentages are consistently lower than anything achievable by hand.
Waste Reduction: Manual Planning vs. Optimized Cutting
| Method | Typical Waste | Planning Time | Best For |
|---|---|---|---|
| No plan (eyeballing) | 20–30% | 0 min | Never recommended |
| Graph paper layout | 15–25% | 20–45 min | Tiny projects (2–4 parts) |
| Spreadsheet / manual calc | 12–20% | 30–60 min | Simple projects |
| Cut list optimizer app | 5–10% | 3–5 min | All project sizes |
✅ Verdict: Of all the strategies on this list, switching from manual cut planning to a cut list optimizer delivers the largest single reduction in plywood waste — typically cutting waste by half or more. The other tips (grain direction, offcuts as stock, factory edge trim, thin-kerf blades) are all valuable additions on top of that foundation, but the optimizer is the non-negotiable starting point.
Quick Reference: Plywood Waste Reduction Checklist
- ☐ Complete your cut list with all parts before buying material
- ☐ Run your list through a cut list optimizer before purchasing sheets
- ☐ Enter your exact saw kerf in the optimizer settings
- ☐ Set grain direction — lock it on visible parts, free it on hidden parts
- ☐ Add all usable offcuts from previous projects as stock
- ☐ Set a trim allowance for factory edges (5–10 mm per edge)
- ☐ Cut largest parts first on every sheet
- ☐ Group parts by material type and thickness separately
- ☐ Consider thin-kerf blades on high-value plywood
- ☐ Follow the optimizer's step-by-step cutting guide at the saw
📱 Reduce Your Plywood Waste Starting With Your Next Project
Cut Optimizer for iPhone and iPad turns your parts list into an optimised, low-waste cutting plan in seconds. Supports saw kerf, grain direction, edge banding, offcut stock, and PDF/SVG export. Built for woodworkers, cabinet makers, and serious DIY makers.
Frequently Asked Questions
How much plywood waste is normal for a woodworking project?
Without any planning, waste typically runs 20–30% of total sheet material. With manual graph paper planning, most woodworkers reduce this to around 15–25%. Using a dedicated cut list optimizer app, it's realistic to achieve 5–10% waste on most projects — roughly half the loss of even careful manual planning. On a 10-sheet cabinet project, the difference between 20% waste and 8% waste is more than one full sheet of plywood.
What is the best way to lay out cuts on a plywood sheet?
The best approach is to enter all your parts into a cut list optimizer and let the algorithm generate the layout. If you're planning manually, start by placing your largest parts first, keeping grain direction in mind, and leaving at least a 5 mm gap between parts for kerf. Always work from two trued reference edges, not raw factory edges.
Does grain direction really affect how much plywood I waste?
Yes, significantly. Locking grain direction on all parts — including hidden structural pieces that don't need it — typically increases waste by 5–15% compared to allowing free rotation on grain-insensitive parts. The most efficient strategy is to lock grain only on visible, appearance-critical parts and allow the optimizer to rotate hidden parts freely. This flexibility lets the algorithm find much tighter nesting arrangements.
Should I buy extra plywood as a buffer, or optimize to the exact sheet count?
Running a cut list optimizer before purchasing gives you a reliable exact sheet count. Most experienced woodworkers using an optimizer buy the calculated number of sheets without a buffer — the optimizer already accounts for kerf, trim allowance, and grain restrictions, so the layout is realistic. If you're working with a particularly expensive or hard-to-source material, buying one extra sheet as insurance is reasonable, but it shouldn't be necessary as a routine habit.
Can I use cut list software for MDF and melamine as well as plywood?
Absolutely. A cut list optimizer works for any rectangular sheet material — plywood, MDF, melamine-faced particleboard, OSB, hardboard, acrylic, sheet metal, and more. The only variables that change are the sheet dimensions, thickness, and whether grain direction applies (it does for veneered faces and some melamine patterns, but not for plain MDF or OSB). The Cut Optimizer app supports all of these material types in the same project.
What do I do with plywood offcuts to avoid waste on future projects?
The best practice is to label every usable offcut with its dimensions using a permanent marker or chalk, then store it flat on dedicated offcut shelves or a lumber cart sorted by thickness and material type. Before starting any new project, measure your offcut stock and enter the usable pieces as stock panels in your cut list calculator app. Setting offcuts as higher-priority stock than full sheets ensures the optimizer uses them first, often eliminating the need for one or more new full sheets.
how to reduce wood waste cutting plywoodminimize plywood waste woodworkingcut list optimizer waste reductionsaw kerf plywood planningplywood offcuts reuse strategygrain direction plywood optimizationhow much plywood waste is normalbest way to lay out plywood cuts