How to Plan Grain Direction When Cutting Plywood

How to Plan Grain Direction When Cutting Plywood
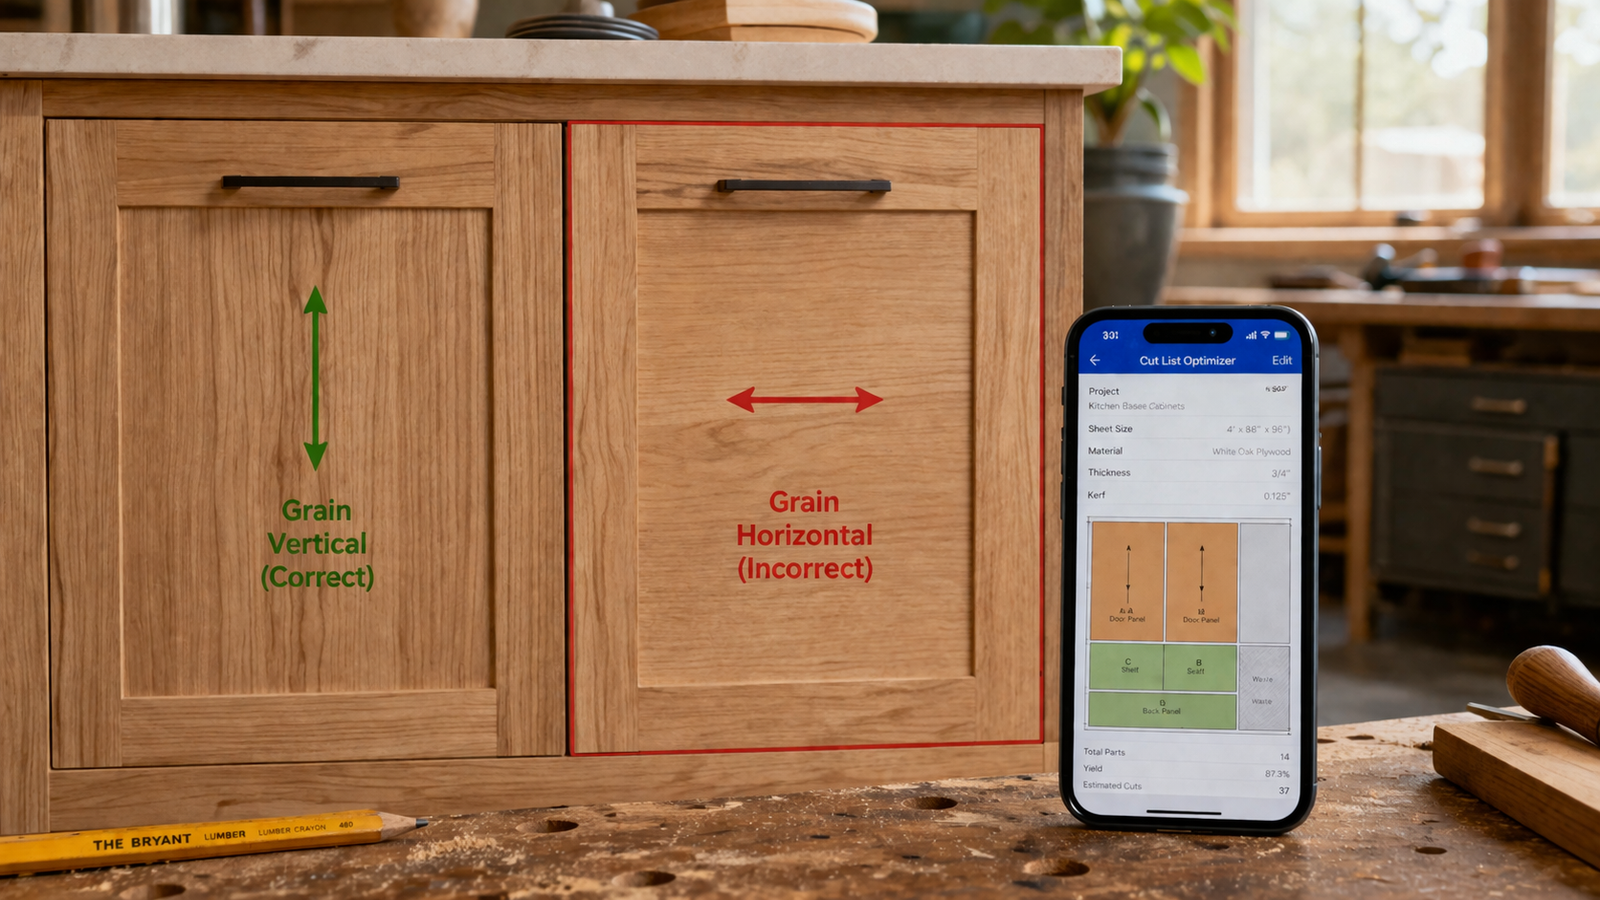
Grain direction is one of the most visually consequential decisions in any plywood project — and one of the easiest to get wrong at the cut planning stage. A cabinet side with cross-grain veneer, a bookshelf top running the wrong way, or a set of door fronts with inconsistent grain orientation are mistakes that can't be fixed after the cuts are made. Unlike dimension errors, which can sometimes be corrected with a trim pass, a grain direction error means remade parts and wasted sheet material. This intermediate guide covers everything you need to know about planning grain direction before you ever touch the saw: what it is, why it matters, which parts need it locked, which parts don't, and how to configure grain direction correctly in a cut list optimizer to maximise both appearance quality and material yield.
🌲 Lock Grain Direction Per Part — Automatically
Cut Optimizer lets you set grain direction on each part individually — locked for appearance-critical pieces, free for structural ones. The optimizer respects your settings while finding the most material-efficient layout.
What Is Grain Direction in Plywood?
Plywood is built from multiple layers of wood veneer glued together with alternating grain directions — this cross-lamination is what gives plywood its dimensional stability and resistance to warping. The face veneer — the outermost layer you see on the finished piece — has a grain that runs in one primary direction, typically along the long dimension of the sheet.
When we talk about grain direction in cut planning, we're referring to the orientation of this face veneer grain relative to the finished part. A part cut with grain running along its length looks and behaves differently from the same part cut with grain running across its width — and on visible surfaces, the difference is immediately obvious to anyone looking at the finished piece.
Understanding and controlling grain direction in your cut list is a mark of intermediate-to-advanced woodworking practice. It separates furniture and cabinetry that looks intentional and professional from work that looks haphazard — even when the dimensions and joinery are identical.
Why Grain Direction Matters — Aesthetics and Structure
Aesthetic Consistency
On any piece of furniture or cabinetry with multiple visible panels — a wardrobe, a bookcase, a set of base cabinets — consistent grain direction creates visual coherence. When all vertical panels have grain running top to bottom and all horizontal panels have grain running left to right, the eye reads the piece as a unified whole. When grain directions are mixed or inconsistent, the piece looks unfinished or poorly considered, even if the proportions and finish quality are excellent.
This is especially critical on face-frame cabinetry, frameless European-style cabinets, and furniture with large visible surfaces. A set of five cabinet doors where one has cross-grain orientation will stand out immediately — and there's no staining or finishing technique that can fix it.
Structural Considerations
Beyond aesthetics, grain direction affects the mechanical behaviour of plywood parts in certain applications. Shelves are the most common example: a shelf with grain running along its length (parallel to the span) has significantly more resistance to sag under load than a shelf with cross-grain orientation. For spans over 600 mm carrying meaningful weight, grain direction along the length is the structurally correct choice — not just the aesthetic one.
Similarly, drawer bottoms, cabinet backs, and panel doors all have conventional grain orientations based on how stress is applied in use. A cut list optimizer that respects grain direction settings ensures you get these right automatically across every part in your project.
How Grain Direction Works on a Standard Plywood Sheet
On a standard 2440 × 1220 mm (8 × 4 ft) plywood sheet, the face grain almost always runs along the long dimension — left to right when the sheet is laid flat in landscape orientation. This means:
- A part cut with its length parallel to the sheet's long edge will have grain along its length
- A part cut with its length perpendicular to the sheet's long edge (i.e. rotated 90°) will have grain across its width
This is the fundamental grain direction trade-off in cut planning. Parts that need grain along their length must be placed with their long dimension parallel to the sheet's long dimension — which is the most space-efficient orientation for tall, narrow parts. Parts that need grain across their width must be rotated, which can create less efficient nesting in some layouts.
💡 Tip: Always verify the grain direction on each new sheet of plywood before cutting. Occasionally, sheets arrive with the face grain running along the short dimension — especially with some imported hardwood plywoods and non-standard panel sizes. A quick visual check before marking your layout prevents a very frustrating and expensive mistake.
Which Parts Need Grain Direction Locked?
Not every part in a project requires a specific grain orientation. The key skill in intermediate cut planning is correctly classifying each part as grain-locked or grain-free, because every grain-locked constraint reduces the optimizer's flexibility and can increase material consumption. Over-constraining a cut list by locking grain on parts that don't need it is a common waste of material that many intermediate woodworkers don't realise they're doing.
Here is a practical classification guide for the most common part types:
| Part Type | Grain Direction | Reason | Lock in Optimizer? |
|---|---|---|---|
| Cabinet side panels | Along length (vertical) | Visible surface; aesthetics and grain continuity | Yes |
| Door fronts | Along length (vertical) | Prominent visible surface; must match adjacent doors | Yes |
| Shelves (open / visible) | Along length (horizontal) | Visible top surface; structural sag resistance | Yes |
| Furniture tops / tabletops | Along length | Primary visible surface; dominant design element | Yes |
| Drawer fronts (applied) | Along length (horizontal) | Visible face; should match door and panel grain direction | Yes |
| Cabinet backs (hidden) | Free / any direction | Not visible in use; no structural grain requirement | No |
| Drawer boxes (sides/back/bottom) | Free / any direction | Hidden behind drawer front; not visible in normal use | No |
| Internal fixed shelves | Along length (preferred) | Structural benefit from grain along span; not always visible | Preferred |
| Subfloor / carcass decks | Free / any direction | Fully hidden; structural load shared by both face directions in plywood | No |
| Face frame rails and stiles | Along length | Narrow, prominent — cross-grain would look visually wrong | Yes |
The Waste Impact of Grain Direction Constraints
Every grain-locked part reduces the optimizer's ability to rotate pieces for tighter nesting. This has a direct impact on material efficiency. The magnitude of the impact depends on the shape of the parts and the mix of grain-locked versus grain-free pieces in the project.
As a rough benchmark: a cut list where all parts are grain-locked typically produces 8–15% more waste than the same list with all parts grain-free. A thoughtfully classified cut list — locking only the parts that genuinely need it — typically recovers half or more of that difference while maintaining full aesthetic integrity.
Here's how grain direction freedom affects a realistic cabinet project with 30 parts:
| Grain Setting | Parts Locked | Typical Waste | Sheets Required |
|---|---|---|---|
| All parts grain-locked | 30 / 30 | ~18% | 6 |
| Visible parts locked only | 18 / 30 | ~11% | 5 |
| Smart classification (this guide) | 14 / 30 | ~8% | 5 |
| All parts grain-free | 0 / 30 | ~6% | 5 |
Locking grain on all 30 parts requires an extra sheet compared to any strategy that frees up even the hidden structural parts. At $60–$80 per sheet of hardwood plywood, that's a real cost — not a theoretical one. Use the Cut Optimizer app to experiment: run the optimization with all parts locked, then rerun with structural parts freed, and compare the waste percentage and sheet count. The difference is often one full sheet.
How to Mark Grain Direction on Your Cut List
The clearest way to record grain direction in a cut list is with a simple three-option system that leaves no ambiguity:
- L (Along Length) — grain runs parallel to the part's longest dimension. This is the most common requirement for vertical cabinet panels, door fronts, and shelves spanning horizontally.
- W (Along Width) — grain runs parallel to the part's shortest dimension. Less common but occasionally required for specific design effects or narrow horizontal panels.
- F (Free) — no grain direction preference. The optimizer can rotate this part freely for the best nesting result.
In the Cut Optimizer app, grain direction is set per part using exactly this type of selection. Parts marked as free are eligible for rotation; parts marked along length or along width are locked to the correct orientation relative to the sheet's face grain. The app displays a grain direction arrow on each part in the cutting diagram, so you can immediately verify that every piece is oriented correctly before printing the layout or heading to the saw.
💡 Intermediate Tip: When entering parts into your cut list, don't classify grain direction from memory. Walk through your project drawings part by part and ask: "Will this surface be visible in normal use?" If yes, lock the grain. If the surface is fully enclosed, hidden behind another panel, or faces into a space the user will never see, mark it free. This systematic approach takes an extra five minutes and can save a sheet of material.
Grain Direction and Part Rotation — What the Optimizer Does
When you run the optimizer with a mix of grain-locked and grain-free parts, here is exactly what happens under the hood:
- Grain-locked parts are placed on the sheet with a fixed orientation — their specified grain axis aligned with the sheet's face grain direction. They cannot be rotated 90°.
- Grain-free parts are treated as freely rotatable rectangles. The optimizer tries both orientations (0° and 90°) and chooses whichever produces better nesting without any appearance penalty.
- The algorithm then runs thousands of arrangement iterations combining all parts — some locked, some free — to find the layout with the lowest total waste across all sheets.
The practical result is that grain-free parts act as "gap fillers" — the optimizer slots them into irregular spaces left by the constrained arrangement of grain-locked parts, reducing waste significantly compared to an all-locked layout. This is the mechanism behind the waste savings shown in the table above, and it's why thoughtful grain classification is as much a material efficiency skill as an aesthetic one.
The Cut Optimizer app makes this process fully transparent — the grain direction arrow on each part in the cutting diagram shows you at a glance which parts were locked and which were rotated, so you can verify the output before committing to cuts.
Special Cases: Matching Grain Across Adjacent Parts
On high-end cabinetry and furniture, grain direction control extends beyond simply orienting each part correctly — it includes grain matching: ensuring that adjacent visible panels appear to come from the same continuous piece of wood, with grain lines flowing naturally from one panel to the next. This technique, known as book-matching or sequence-matching, is standard practice in bespoke furniture and premium kitchen cabinetry.
True grain matching requires sourcing sequential veneer faces from the same flitch — something that goes beyond what a cut list optimizer handles automatically. However, a cut list optimizer is still a critical prerequisite: you need to know exactly which parts come from which sheet and in what relative position before you can plan a grain-matched layout. The optimizer gives you this map; the grain matching is then executed by following the layout precisely at the saw.
For most cabinet and furniture projects, full grain matching isn't required — consistent grain direction across all visible parts of the same type is sufficient for a professional result. That is entirely achievable with careful cut list grain classification and a good optimizer.
Common Grain Direction Mistakes and How to Avoid Them
| Mistake | What Goes Wrong | Prevention |
|---|---|---|
| Locking grain on all parts by default | Unnecessary waste; often adds a full extra sheet to the project | Classify each part individually — only lock what's visible |
| Not checking grain direction on the physical sheet before cutting | Some sheets have grain running along the short dimension; parts cut incorrectly | Visually confirm face grain direction on every new sheet before marking |
| Inconsistent grain on matching door sets | One door in a set has cross-grain veneer — visually obvious in the finished piece | Mark all doors in a set as grain-locked in the same direction; verify in the cutting diagram |
| Assuming rotation is always harmless on hidden parts | A rotated drawer bottom on a heavy-use drawer may sag faster under load | For structural hidden parts spanning long distances, consider marking as "preferred" grain along length even if not strictly locked |
| Not verifying grain arrows in the cutting diagram before cutting | A data entry error in the optimizer results in a locked part placed with incorrect orientation | Always review the cutting diagram in the Cut Optimizer app before printing or cutting — check grain arrows on every appearance-critical part |
⚠️ Important: Grain direction errors on veneered plywood are permanent. Unlike dimension errors, which can sometimes be corrected with a second pass on the table saw, a part cut with the wrong grain orientation must be remade from scratch. There is no fix. This is why verifying grain direction arrows in the cutting diagram — before touching the saw — is a non-negotiable step on any appearance-grade project.
Grain Direction for Non-Plywood Sheet Goods
Grain direction planning doesn't only apply to plywood. Several other common sheet materials also have directional considerations worth noting:
- Melamine-faced particleboard — most plain colours have no grain direction, so all parts can be marked free. However, wood-grain melamine patterns do have a printed grain direction that needs to be locked on visible surfaces, just like real veneer plywood.
- MDF — has no grain structure and no directional property. All MDF parts can always be marked free in the cut list optimizer, giving the algorithm maximum flexibility for nesting.
- OSB (oriented strand board) — has a structural grain direction, with strands aligned along the long panel dimension for maximum bending strength. For structural applications, orienting the strong axis correctly matters; for non-structural shop furniture, it's usually irrelevant.
- Hardboard and thin plywood backing panels — typically no grain direction requirement unless the face veneer is visible, in which case treat it the same as standard veneered plywood.
✅ Verdict: Grain direction planning sits at the intersection of aesthetics, structural performance, and material efficiency. Getting it right requires classifying each part individually — not applying a blanket lock-everything or free-everything setting. The most effective workflow is to classify every part in your cut list before optimizing, verify grain arrows in the cutting diagram after optimizing, and confirm face grain direction on the physical sheet before cutting. This three-step verification costs five minutes and prevents the most expensive type of plywood mistake.
📱 Plan Grain Direction the Right Way — Part by Part
Cut Optimizer lets you set grain direction individually for every part in your project — locked for visible surfaces, free for hidden structural parts. The result is a cutting diagram that's both aesthetically correct and as material-efficient as possible. Available for iPhone and iPad.
Frequently Asked Questions
What does grain direction mean in a cut list?
In a cut list, grain direction specifies the orientation of the face veneer grain on each plywood part relative to the part's dimensions. A part marked "grain along length" will be placed on the sheet so the face veneer runs parallel to its longest dimension; a part marked "free" can be rotated to any orientation by the optimizer. Correctly classifying grain direction in your cut list ensures visible parts look intentional and professional while allowing hidden parts the flexibility needed for efficient material use. The Cut Optimizer app applies these settings automatically during layout generation.
Does grain direction affect the strength of plywood shelves?
Yes — for open shelves spanning more than about 600 mm under significant load. A shelf with grain running along its length (parallel to the span) has considerably more resistance to mid-span deflection than a cross-grain shelf of the same dimensions, because the long face veneer fibres act as a beam in tension along the bottom face. For structural shelving, especially in bookcases and kitchen cabinets, grain along the length is both the correct aesthetic and structural choice. For short spans or lightly loaded shelves, the practical difference is small.
Do I need to lock grain direction on MDF parts?
No. MDF has no grain structure — it's manufactured from randomly oriented fine fibres bonded under heat and pressure, giving it uniform properties in all directions. All MDF parts can be marked as grain-free in your cut list optimizer, giving the algorithm maximum freedom to rotate and nest them efficiently. This is one reason MDF layouts typically achieve lower waste percentages than equivalent veneered plywood projects.
How much extra plywood waste does grain locking cause?
Locking grain direction on every part in a project — including hidden structural parts that don't require it — typically adds 8–15% to material waste compared to a fully grain-free layout. A thoughtfully classified cut list, where only genuinely appearance-critical parts are locked and the rest are freed, usually recovers most of this difference. On a five-to-six-sheet project, the difference between locking all parts and locking only visible parts often amounts to one full sheet of plywood — a significant material and cost saving achieved simply by reviewing your grain settings before running the optimizer.
Can grain direction be different for parts cut from the same sheet?
Yes, and this is perfectly normal. A cutting diagram may show a cabinet side panel (grain along its 720 mm length) and a drawer bottom (grain rotated 90° to fill a gap) on the same sheet. The grain direction of the drawer bottom is irrelevant since it's hidden in use, and the optimizer correctly rotates it to maximize yield. What matters is that every appearance-critical part — every piece the end user will see — has the correct and consistent grain direction as specified in your cut list.
What is the grain direction of a standard 4×8 plywood sheet?
On a standard 2440 × 1220 mm (8 × 4 ft) plywood sheet, the face veneer grain runs along the long dimension — left to right when the sheet is laid flat in landscape orientation. This means a part placed with its long dimension parallel to the sheet's long edge will have grain along its length. A part rotated 90° will have grain running across its width. This convention holds for the vast majority of construction and hardwood plywood manufactured in North America, Europe, and most other markets — but it's always worth a visual confirmation on any unfamiliar or imported sheet product before cutting.
how to plan grain direction plywoodgrain direction cut list woodworkingplywood grain direction cabinet makinglock grain direction cut optimizergrain direction shelves structuralplywood face veneer orientationgrain free parts cut list efficiencymelamine grain direction cut list