How to Export a Cutting Plan as PDF and Share It

How to Export a Cutting Plan as PDF and Share It with Your Workshop
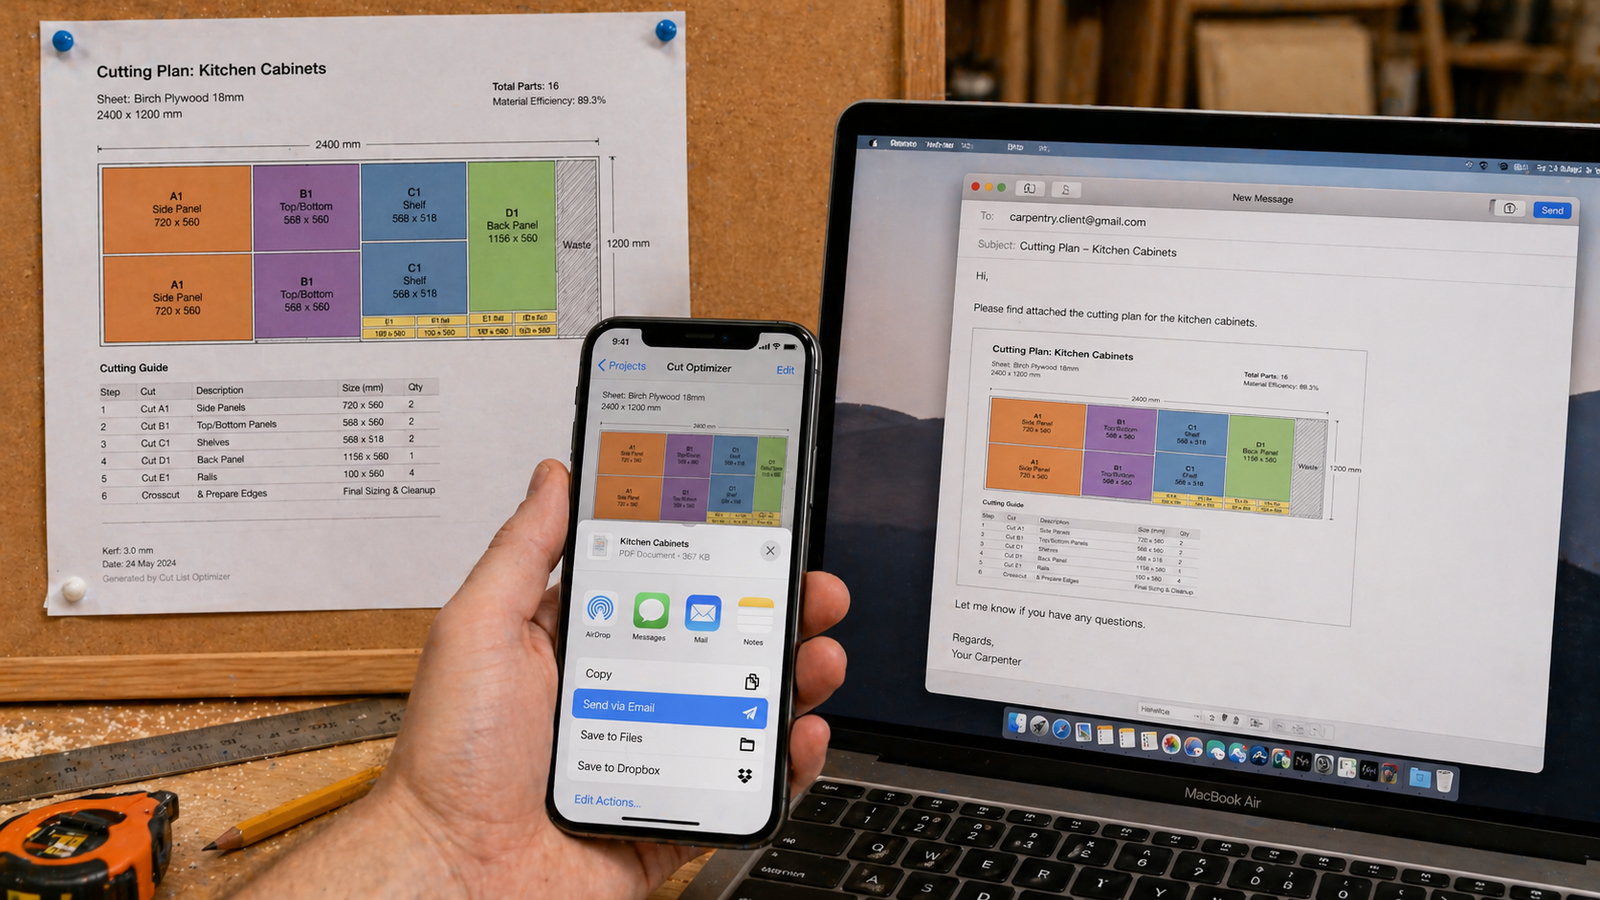
A cutting plan that only exists on your phone screen is only half as useful as one you can print, pin to the wall, hand to a colleague, or send to a panel shop before you arrive. The ability to export your cutting plan as a PDF — and share it instantly with whoever needs it — is one of the most practical features in any cut list optimizer app, and one that's often underused by woodworkers who don't realise how much workflow friction it eliminates. Whether you're a solo maker who wants a printed diagram at the saw, a cabinet maker sharing plans with a cutting service, or a workshop team where one person plans and another cuts, exporting and sharing your cutting plan as a PDF is the step that moves your project from the planning stage into the physical world. This guide covers how to export a cutting plan PDF from the Cut Optimizer app, what the PDF contains, how to share it across every common scenario, and how to get the most out of it once it's in someone's hands.
📄 Generate a Print-Ready Cutting Plan PDF in Seconds
Cut Optimizer produces a complete PDF cutting plan — diagrams, step-by-step guide, parts summary, and waste statistics — ready to print, share, or send to a panel shop. Available free for iPhone and iPad.
Why Export a Cutting Plan as PDF?
The interactive cutting diagram on your phone or tablet is excellent at the planning stage — you can zoom in, tap parts for details, and work through the step-by-step guide with active highlighting. But in a working workshop, a phone screen has real limitations: sawdust and moisture on your hands, glare from workshop lighting, a screen that dims or locks mid-cut, and the constant risk of it falling off a shelf into a pile of shavings.
A printed PDF cutting plan solves all of these problems. It's always visible, never locks, works in full sunlight or dim workshop lighting, can be pinned to the wall beside the saw, annotated with chalk or pencil as cuts are completed, and handed to anyone who needs it without requiring them to have the app installed. For professional woodworkers and cabinet makers, a PDF cutting plan is also a project record — something you can file with job documentation, email to a client as part of a project proposal, or archive for reference on repeat orders.
Beyond the practical workshop advantages, the PDF export from a cut list optimizer app is a communication tool. It replaces verbal descriptions of cut sequences, hand-sketched diagrams on the back of an envelope, and ambiguous lists of dimensions that get misread at the saw. One clear document, shared with everyone involved, eliminates the most common source of cutting errors in collaborative workshop environments.
What the Cut Optimizer PDF Export Contains
A well-designed cutting plan PDF should be a self-contained document — everything someone needs to execute the cuts accurately, with no need to refer back to the app or any other document. The PDF export from the Cut Optimizer app includes the following sections:
Project Summary Page
The opening page gives an at-a-glance overview of the entire project: project name, total number of parts, number of stock sheets used, total waste percentage, and any project-level notes you've added. This is the page you'd share with a client as proof of planning rigour, or review yourself before heading to the lumber yard to confirm your sheet count.
Parts List
A complete table of every part in the project — name, quantity, width, length, thickness, material, grain direction, and edge banding requirements. This is the reference document for marking parts after cutting: once a piece is cut, you look it up in the parts list, write its name on the face with chalk, and tick it off. On collaborative projects, the parts list also tells anyone assembling the cabinet which piece is which without needing the app.
Cutting Diagrams (One Per Sheet)
The centrepiece of the PDF — a scaled, colour-coded cutting diagram for each stock sheet in the project. Each diagram shows the sheet outline, every part placed and labelled with its name and dimensions, grain direction arrows on applicable parts, edge banding indicators on banded edges, and the waste area clearly delineated. The per-sheet waste percentage is displayed alongside each diagram.
These diagrams are scaled proportionally to the sheet dimensions, so a 2440 × 1220 mm sheet and a 1200 × 600 mm offcut appear at different sizes on the page — making it immediately clear which layout corresponds to which physical sheet of material.
Step-by-Step Cutting Guide
For each sheet, the PDF includes the full step-by-step cutting sequence — every cut labelled as a rip or crosscut, with the measurement from the reference edge and the resulting piece or strip. This is the guide you follow at the saw, step by step, to execute the cutting diagram correctly and in the right order.
Materials and Edge Banding Summary
A summary table listing total quantity of each material type and thickness needed (in sheets), plus total edge banding length per material. This section is directly useful for purchasing: it tells you exactly how many sheets of each material to buy and how many linear metres of banding tape to order, without any additional calculation.
💡 Tip: Before exporting, add a project name and any relevant notes in the Cut Optimizer app settings. The project name appears as the document title on the PDF cover page — making it easy to identify the file in your downloads, email attachments, or job folder when you have multiple projects on the go simultaneously.
How to Export the PDF from the Cut Optimizer App
Exporting a cutting plan PDF from the Cut Optimizer app on iPhone or iPad is a two-tap process once your optimization has been run:
- Run the optimization — tap Calculate and confirm the cutting diagrams look correct. Review grain arrows on appearance-critical parts and check the waste percentage before exporting.
- Tap the Share or Export button — this is typically found in the top-right corner of the results screen, represented by the standard iOS share icon (a box with an upward arrow).
- Select PDF from the export format options. (The app also offers SVG export for CAD or CNC use — select PDF for print and general sharing.)
- The iOS Share Sheet appears — from here you can save the PDF to Files, send it via Mail, share via AirDrop, send to WhatsApp or Messenger, save to iCloud Drive, print directly, or open in any PDF-compatible app installed on your device.
The PDF is generated entirely on-device — no internet connection is required and no data leaves your phone. The file is typically between 500 KB and 2 MB for a medium-complexity project, making it fast to send even on a mobile data connection.
Sharing Scenarios — Who Gets the PDF and How
Scenario 1: Solo Workshop — Printing for the Wall
The most common use case: you're working alone and want a printed cutting plan to work from at the saw. From the iOS Share Sheet, tap Print to send the PDF directly to an AirPrint-compatible printer on your network. Print at full size (A4 or US Letter) — the cutting diagrams scale correctly to the page dimensions and remain fully legible at standard print size.
Print one copy per sheet of material and pin each cutting diagram directly above your saw or workbench. As you complete each cut, mark it off on the printed guide with a pencil. When every cut on a sheet's diagram is ticked off, that sheet is done — a satisfying and error-resistant way to track progress through a multi-sheet project.
Scenario 2: Sending to a Lumber Yard or Panel Cutting Service
Many lumber yards and sheet material suppliers offer a panel cutting service — they'll rip and crosscut your sheets to specified dimensions for a small charge per cut. Bringing a clear cutting plan to this service eliminates the miscommunication errors that occur when describing dimensions verbally at a noisy panel saw.
Export the PDF from your Cut Optimizer app before you leave for the yard and either email it to the cutting service in advance or show it on your phone when you arrive. The cutting diagram shows the cutter exactly how each sheet should be divided; the step-by-step guide shows the cut sequence. Ask for cuts to be made 10–15 mm oversize if you plan to trim to exact final dimensions at home — note this on a separate message when sharing the PDF so the operator knows your preference.
💡 Pro Tip: When emailing a cutting plan PDF to a panel shop, include the PDF as an attachment and in the email body briefly note: total sheets required per material type (from the materials summary page), your preferred kerf value if different from their standard setup, and whether cuts should be to final size or oversize for trim. The materials summary table from the Cut Optimizer PDF gives you all of this information in one place.
Scenario 3: Sharing with a Workshop Partner or Apprentice
In a two-person workshop where one person plans and the other cuts, the PDF cutting plan is the handoff document. From the iOS Share Sheet, send the PDF via AirDrop (instant, no file size limit, no internet needed if both devices are nearby), iMessage, WhatsApp, or email. The recipient can open it in any PDF viewer on any device — they don't need the Cut Optimizer app installed.
For clarity in a two-person setup, have the planner add annotations to the PDF before sharing: a quick note on which cabinets go in which room, which sheets should be cut first, or any parts that require special handling. iOS's built-in Markup tool (available from the Share Sheet under "Markup") lets you annotate the PDF with text, arrows, and highlights before sending.
Scenario 4: Filing with Job Documentation
For professional cabinet makers and workshop businesses, the cutting plan PDF is a job record. Save each project's PDF to a dedicated job folder in iCloud Drive, Dropbox, or Google Drive — named with the client name, job number, and date. This creates a complete paper trail: if a client queries a cut dimension, if a part needs to be recut weeks later, or if the same kitchen layout needs to be reproduced for a second client, the cutting plan PDF is the authoritative reference.
From the iOS Share Sheet, tap Save to Files and choose your preferred cloud storage location. The PDF syncs automatically to all your devices and is accessible from any computer or tablet, not just the iPhone that generated it.
Scenario 5: Sharing with a CNC or Flatbed Cutting Service
For projects being cut on a CNC router or flatbed cutting machine at a third-party service, the SVG export from the Cut Optimizer app is often more useful than the PDF — it provides vector geometry that can be imported directly into CAM software. However, sharing the PDF alongside the SVG is still valuable: the PDF provides a human-readable reference that the machine operator can use to verify the nesting layout before running the file, and the materials summary makes it easy to confirm sheet requirements and confirm pricing.
PDF vs. SVG Export — Which to Use When
| Format | Best For | Can Be Opened By | Printed? |
|---|---|---|---|
| Printing, sharing, job filing, panel shop communication | Any device, any OS, any PDF viewer | Yes — optimised for print | |
| SVG | CNC/CAM software import, large-format display, design integration | Illustrator, Inkscape, CAD/CAM software, modern browsers | Possible but not ideal |
For almost all woodworking and cabinet making workflows, the PDF is the right export format. SVG is a specialist format for CAD and CNC workflows. When in doubt, export PDF — it opens on any device without specialist software and is the format cutting services, clients, and colleagues expect to receive.
Getting the Most Out of Your Printed Cutting Plan
A printed PDF cutting plan is most useful when it's used actively — not just consulted occasionally. Here's how professional woodworkers use printed cutting plans to run efficient, accurate cutting sessions:
- One sheet of paper per stock panel — print each sheet's cutting diagram on a separate page and work from them one at a time. Pin the current sheet's diagram at eye level beside the saw; file the rest until needed.
- Annotate as you cut — use a pencil to tick off each step in the cutting guide as you complete it. Never move to the next cut until the previous one is ticked. This prevents the most common workshop error: losing your place and cutting the same piece twice.
- Write part names on the wood immediately — after each cut, write the part name from the diagram directly on the cut piece using chalk or a lumber crayon. Don't rely on memory to identify pieces later, especially when several parts have similar dimensions.
- Keep the parts list accessible — print the parts list on a separate sheet and keep it on the assembly bench. When a cut piece arrives at the assembly stage, the person assembling can verify dimensions and edge banding requirements against the parts list without referring to the optimizer app.
- File completed sheets — once all cuts on a sheet are done and ticked off, file that sheet's diagram in a "completed" pile. A quick count tells you how many sheets remain to be cut, which is useful when managing time or switching between sessions.
⚠️ Version Control: If you make any changes to your parts list or settings after exporting the PDF — adding a part, changing a dimension, adjusting the kerf value — always re-run the optimisation and export a new PDF before cutting. An outdated cutting plan in the workshop is worse than no plan at all, because it gives false confidence in incorrect dimensions. Date-stamp your PDF filenames (e.g. "Kitchen-Base-Cabinets-2024-03-15.pdf") so you can always identify the most recent version.
Sharing the Cutting Plan with iCloud — Seamless Cross-Device Workflow
If you plan projects on your iPhone and cut from your iPad — or vice versa — the Cut Optimizer app syncs projects automatically across all your Apple devices via iCloud. This means the cutting plan you created at the kitchen table on your iPhone is instantly available on the iPad propped beside the workshop saw, including the interactive step-by-step guide with live cut highlighting.
For multi-device workflows, you can use both outputs simultaneously: the interactive guide on the iPad at the saw for step-by-step navigation, and the printed PDF pinned to the wall for at-a-glance reference of the full sheet layout. These two representations of the same cutting plan complement each other perfectly in the workshop.
Sharing Cutting Plans with Non-Apple Users
The Cut Optimizer app is currently iOS and macOS only — but the PDF it generates is universally compatible. Android users, Windows users, and anyone without the app can receive, open, and print the PDF on any device using any PDF viewer. When sharing with someone outside the Apple ecosystem, simply email the PDF or send it via any cross-platform messaging service. The recipient gets a complete, self-contained cutting plan document without needing any specialist software.
✅ Verdict: The PDF export is the feature that bridges the gap between digital planning and physical workshop execution. A cutting plan that stays on your phone is a planning tool. A cutting plan that's been printed, pinned to the wall, and ticked off cut by cut is a workshop management tool — one that eliminates lost measurements, prevents sequence errors, and keeps every person in the workshop aligned. Export the PDF. Print it. Use it.
📱 Generate Your Cutting Plan PDF in Under Five Minutes
Cut Optimizer for iPhone and iPad produces a complete, print-ready PDF cutting plan — diagrams, step-by-step guide, parts list, materials summary, and waste statistics. Share it instantly via email, AirDrop, or any messaging app. Free to download.
Frequently Asked Questions
Can I export a cutting plan as PDF directly from my iPhone?
Yes — the Cut Optimizer app exports a complete PDF cutting plan directly from iPhone or iPad using the standard iOS Share Sheet. No computer or additional software is required. Once generated, the PDF can be saved to Files, sent via email or AirDrop, shared to any messaging app, or printed directly to an AirPrint-compatible printer — all from the same share panel.
What does a cutting plan PDF from a cut list optimizer include?
A complete cutting plan PDF from the Cut Optimizer app includes a project summary page with total sheet count and waste statistics, a complete parts list table, one colour-coded cutting diagram per stock sheet with grain direction arrows and edge banding indicators, a step-by-step cutting guide sequenced for table saw or track saw execution, and a materials and edge banding summary for purchasing. It is a self-contained document — no additional reference to the app is needed to use it.
Can I share a cutting plan PDF with someone who doesn't have the Cut Optimizer app?
Yes — the exported PDF is a standard document that opens on any device and any operating system using any PDF viewer. The recipient does not need the Cut Optimizer app or any woodworking-specific software to view, print, or use the cutting plan. This makes PDF sharing practical for sending plans to lumber yard cutting services, workshop partners, clients, or contractors regardless of what device or platform they use.
How do I send a cutting plan PDF to a panel shop before I arrive?
Export the PDF from the Cut Optimizer app and email it to the panel shop with a brief note covering the total sheets required per material type (taken from the materials summary page in the PDF), your preferred kerf value if it differs from their standard setup, and whether you want cuts to final dimensions or oversize for trimming at home. Most panel shops are happy to work from a clear PDF cutting plan — it reduces errors and speeds up the cutting service for both parties.
What is SVG export and when should I use it instead of PDF?
SVG (Scalable Vector Graphics) is a vector file format that preserves the geometric accuracy of the cutting diagram at any scale — it can be imported into CAD software, CAM toolpath generators, Illustrator, or Inkscape without any quality loss. Use SVG when sending a cutting layout to a CNC or flatbed routing service that needs to import the nesting geometry directly into their machine software. For all other uses — printing, sharing, filing, panel shop communication — PDF is the correct and more universally compatible format. The Cut Optimizer offers both formats from the same export menu.
Can I annotate the cutting plan PDF before sharing it?
Yes — iOS includes a built-in Markup tool accessible directly from the Share Sheet when saving or sharing a PDF. Tap the PDF preview in the Share Sheet, then tap the Markup icon (a pen tip) to add text annotations, arrows, highlights, or freehand notes before sending. This is useful for adding assembly notes, flagging parts that need special handling, or marking which cabinets go in which location before sending the plan to a workshop partner or cutting service. Third-party PDF annotation apps like PDF Expert or Notability offer more advanced markup tools if needed.
export cutting plan PDF woodworkingcut list optimizer PDF export iPhoneshare cutting plan panel shopwoodworking cutting diagram PDFprint cut list plan workshopcut optimizer SVG export CNCcutting plan PDF share workshop partnerplywood cutting plan PDF download