How to Cut a Full Sheet of Plywood by Yourself

How to Cut a Full Sheet of Plywood by Yourself
A full sheet of 4×8 plywood weighs between 20 and 35 kg depending on thickness and species — heavy enough to be genuinely awkward for one person to handle safely, and large enough to be nearly unmanageable on a standard table saw without support. Yet the vast majority of hobby woodworkers and DIYers work alone, without a second pair of hands to stabilise the sheet or catch the offcut. The good news is that solo plywood breakdown is entirely achievable with the right setup, the right sequence, and a little preparation. This guide walks you through every method for cutting a full sheet of plywood by yourself — safely, accurately, and without needing a second person or a professional panel saw. It also covers how having a proper cut list and cutting plan prepared in advance makes solo cutting significantly more manageable.
📐 Plan Your Cuts Before You Start — Work Smarter Solo
Cut Optimizer generates a step-by-step cutting plan for your project before you touch the saw. Know exactly which cuts to make, in what order, on every sheet — so your solo cutting session is efficient and mistake-free.
Why Full Sheets Are Difficult to Cut Alone
The challenge of solo plywood breakdown comes down to three overlapping problems:
- Weight and flex — a full 18 mm sheet of birch plywood weighs around 30 kg and has enough flex to tip or bind mid-cut without support at both ends and the middle
- Table saw throat limitations — most hobby table saws have a relatively narrow outfeed zone; a 2440 mm sheet extends well beyond both the infeed and outfeed sides simultaneously, requiring support on both ends to avoid the sheet tipping and pinching the blade
- Accuracy under movement — when a large panel shifts or flexes mid-cut, the cut line deviates, the blade can bind, and the part comes out undersized or out of square
The solution to all three problems is the same: break the full sheet down into manageable sections before making precision cuts. This is the core principle of solo plywood breakdown, and it's exactly the cutting sequence that a cut list optimizer app generates automatically — rough breakdown first, precision cuts second.
Method 1 — Track Saw on the Floor (Best for Solo Work)
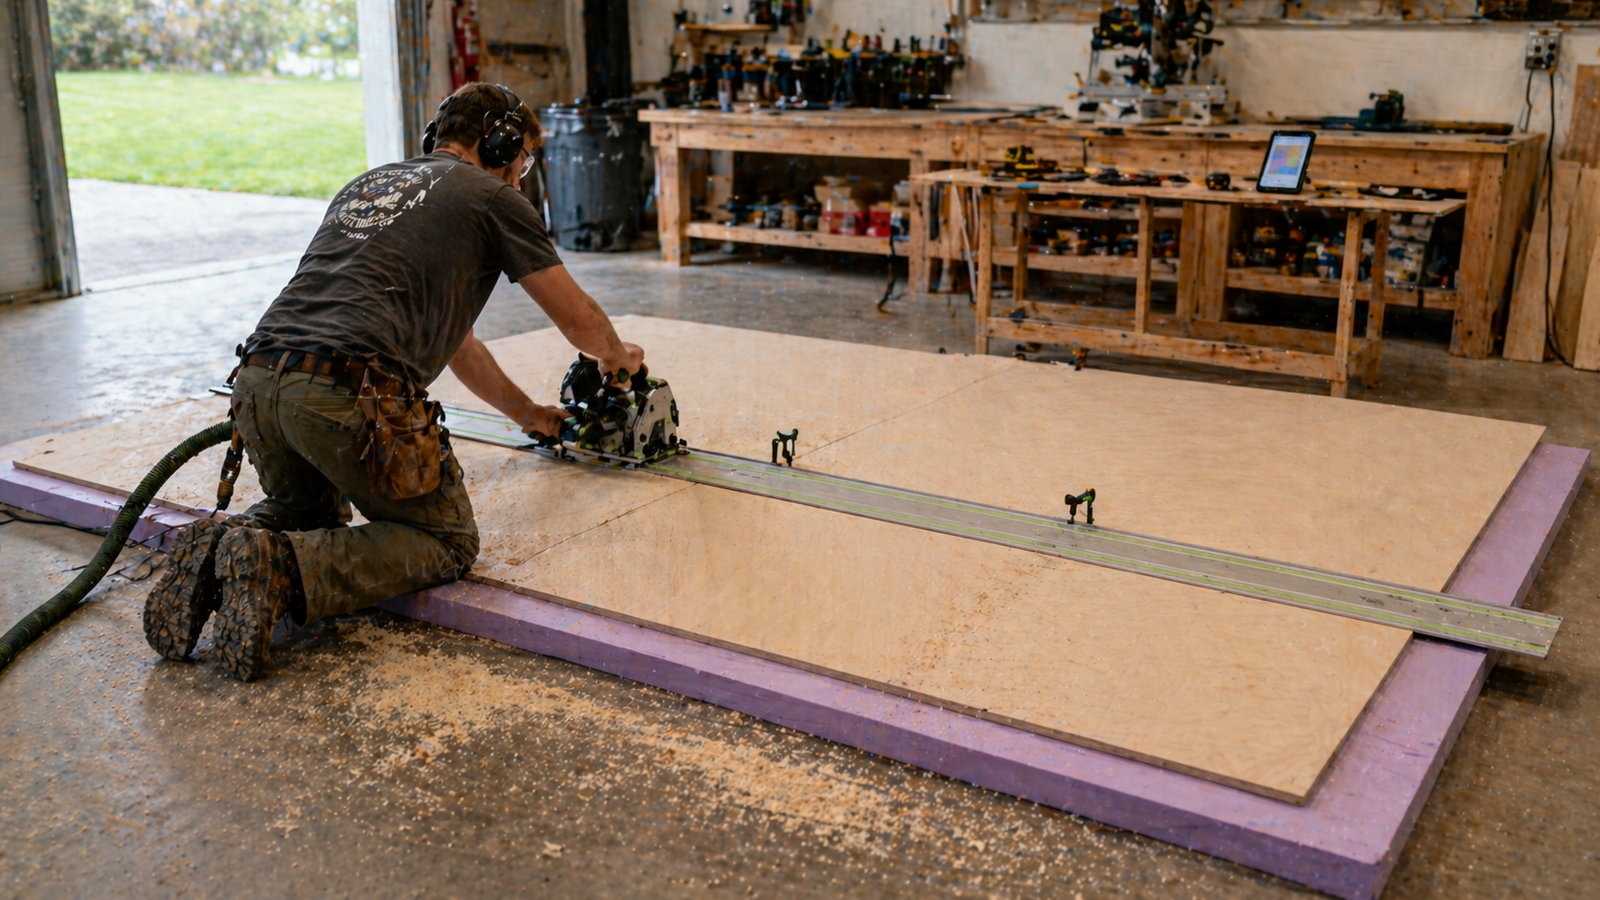
The track saw is the single best tool for solo full-sheet breakdown. The sheet stays flat on the floor or on foam insulation boards, the guide rail ensures a perfectly straight cut, and there's no outfeed support problem because the material never needs to be lifted or fed through a machine. This is how professional panel shops and site carpenters break down full sheets without a panel saw — and it works just as well in a home workshop.
What You Need
- A track saw (plunge saw) and compatible guide rail — a 1400 mm rail handles most rip cuts on a 1220 mm wide sheet with room to clamp
- Two sheets of 50 mm thick rigid foam insulation (XPS or EPS) as a sacrificial cutting surface — available from any building materials supplier for a few dollars each
- Two rail clamps to secure the guide rail to the sheet
- A tape measure and pencil for marking
The Setup
- Lay the foam sheets on the floor side by side to create a surface slightly larger than your plywood sheet. The foam supports the plywood completely and absorbs the blade at the end of each cut without damaging the floor or the saw.
- Place the plywood face-down on the foam if you're concerned about tear-out on the face veneer — the track saw cuts from above, so the face-down surface is the one most at risk. Alternatively, use a fine-tooth blade with a scoring facility to eliminate tear-out on the top face.
- Mark your cut line on the sheet and position the guide rail so the blade will track exactly on your line. Most track saw rails have an anti-splinter strip that shows you precisely where the blade will cut.
- Clamp the rail at both ends and make the cut in one smooth, steady pass. The track saw's plunge mechanism means you can start the cut anywhere along the sheet — no need to approach from the edge.
💡 Pro Tip: Use 50 mm thick rigid foam rather than timber offcuts as your cutting surface. Timber offcuts can shift, leave gaps, and can be accidentally cut through. Foam is self-healing for shallow cuts, provides uniform support across the full sheet, and costs almost nothing. Two sheets of 50 mm foam are the single most useful workshop purchase for solo plywood work.
Method 2 — Circular Saw with a Straightedge Guide
If you don't have a track saw, a standard circular saw guided by a clamped straightedge or a shop-made shooting board produces excellent results on a foam-supported sheet on the floor. The setup is slightly more involved — you need to accurately account for the offset between the blade and the saw's baseplate edge — but the results are comparable once you've made the initial offset measurement.
How to Set Up the Guide
- Measure the blade-to-baseplate offset — this is the distance from the cutting edge of the blade to the left edge of the circular saw's baseplate. Make this measurement with a ruler from the blade teeth to the baseplate edge. A typical value is 38–45 mm, but it varies by saw.
- Mark your cut line on the sheet and then mark a second parallel line offset by your baseplate measurement — this is where you clamp the straightedge guide.
- Clamp the straightedge firmly at both ends with F-clamps or C-clamps, checking it doesn't move when you press against it.
- Run the circular saw with the baseplate tight against the guide for the full length of the cut. Keep consistent pressure against the guide throughout — any deviation shows immediately in the cut quality.
⚠️ Safety Note: Always cut with the good face of the sheet facing down when using a circular saw — circular saw blades cut on the upstroke, meaning tear-out occurs on the top face. Place the sheet face-down on the foam to keep the visible surface clean. Track saws typically cut on the downstroke and produce cleaner results on the top face, so the opposite orientation applies.
Method 3 — Table Saw with Outfeed and Infeed Support
The table saw produces the most accurate rip cuts for finish work, but solo operation with full sheets demands adequate support on all sides of the blade. Without it, the sheet tips, the blade binds, and the cut wanders. With the right support system, a solo woodworker can run full sheets through a table saw safely and accurately.
Support Solutions for Solo Table Saw Work
- Roller stands — adjustable-height roller stands on both infeed and outfeed sides provide smooth, adjustable support that moves with the sheet. Set the roller height to exactly match the table saw surface so the sheet feeds level throughout the cut.
- Outfeed table — a fixed outfeed table at table saw height is the most reliable solo solution for long rip cuts. Build or buy one that matches your saw's table height precisely and extends at least 600 mm past the blade.
- Workbench at table height — if your workbench is the same height as your table saw table, position it directly behind the saw as a temporary outfeed surface for occasional full-sheet work.
The Two-Stage Approach for Solo Table Saw Work
Rather than trying to manage a full 2440 × 1220 mm sheet on the table saw solo, use this two-stage approach that professional solo woodworkers rely on:
- Stage 1 — Rough breakdown on the floor: Use a track saw or circular saw with a straightedge guide to break the full sheet into sections that are manageable on the table saw — typically strips of 600–800 mm width and whatever length the project requires. A rough cut 10–20 mm oversize is fine at this stage.
- Stage 2 — Precision cuts on the table saw: Run the smaller, manageable sections through the table saw to trim to exact finished dimensions. Smaller pieces are easier to handle solo, require less outfeed support, and are safer to control through the blade.
This is identical to the cutting sequence generated by the Cut Optimizer app — the step-by-step cutting guide always sequences rough breakdown cuts before precision trim cuts, specifically because this approach is safer and more accurate, especially for solo work.
Method 4 — Using a Panel Saw at a Lumber Yard or Home Centre
Many lumber yards, home improvement centres, and hardwood dealers offer a sheet-cutting service — they'll rip and crosscut your full sheets to rough dimensions for a small fee per cut, typically $1–$3 per cut. This is an excellent option for solo woodworkers who lack a track saw or adequate table saw support, and it solves the transportation problem simultaneously: smaller pieces fit in a car where full sheets don't.
To use this service effectively, you need a clear cutting plan before you arrive — ideally generated by a cut list optimizer — so you can tell the cutter exactly which dimensions you need from each sheet. Ask for cuts 10–15 mm oversize if you plan to trim to final dimensions at home on the table saw. This gives you a clean reference edge to work from and some margin for any slight inaccuracy in the store's panel saw setup.
💡 Tip: When using a lumber yard cutting service, bring a printed PDF of your cutting diagram from the Cut Optimizer app. It shows the cutter exactly what you need without any ambiguity — eliminating the miscommunication errors that occur when describing dimensions verbally at a noisy panel saw.
Setting Up Your Workshop for Solo Sheet Handling
Beyond the cutting method itself, a few simple workshop setup improvements make solo plywood work dramatically easier and safer:
The Foam Floor Setup
As covered in Method 1, two sheets of 50 mm XPS rigid foam insulation laid on the floor create a flat, supportive, sacrificial cutting surface for any floor-based breakdown method. This is the most space-efficient solo cutting setup and requires no permanent workshop infrastructure. Keep the foam sheets stored flat against a wall between uses — they last for years of cutting sessions.
Panel Carrier or Plywood Cart
Moving full sheets of plywood around the workshop is where most solo injuries occur — not at the saw. A simple panel carrier (a looped rope or strap that lets you carry a sheet vertically with one hand) makes moving full sheets from the stack to the cutting area solo-manageable. A rolling plywood cart or vertical sheet storage rack with a slightly sloped floor keeps sheets accessible without having to wrestle them from a horizontal stack.
Layout Horses or Low Sawhorses
A pair of low sawhorses (400–500 mm height) placed parallel to each other at roughly 800 mm spacing creates a stable breakdown platform at a comfortable working height — no floor work required, and easier on the knees. Cover the sawhorse tops with carpet scraps or foam to prevent scratching the face veneer during layout and cutting.
The Cutting Sequence for Solo Work — Why It Matters
Even with the right tools and setup, cutting in the wrong order creates unnecessary difficulty when working alone. The correct sequence for solo plywood breakdown is:
- Trim the factory edges first — take 8–10 mm off one long edge and one short edge to create two true reference edges. Do this with the sheet on the foam floor using a track saw or circular saw with a guide.
- Make your longest rough breakdown cuts next — divide the sheet into strips or sections with cuts 10–20 mm oversize. Larger pieces are still manageable on the floor setup; smaller pieces become awkward to clamp and guide.
- Work from large to small — as the sheet breaks into progressively smaller sections, each piece becomes easier to handle solo. By the time you're making the final precision crosscuts, you're working with pieces that fit comfortably on a workbench or table saw sled.
- Make precision cuts last — trim each rough section to exact final dimensions on the table saw or with the guide rail once it's a manageable size. This is where accuracy matters most, and manageable piece size is what enables it.
This is precisely the sequence that a step-by-step cutting guide from the Cut Optimizer app follows. The algorithm generates a guillotine-cut sequence specifically because it produces the safest and most manageable progression from full sheet to individual parts — which is especially important when you're working without assistance.
Safety Rules for Solo Plywood Cutting
- Never stand directly behind the blade on a table saw — if the sheet kicks back, it travels in a straight line directly away from the blade. Stand slightly to the side of the blade line.
- Use push sticks for narrow rips — any rip cut producing a piece narrower than 150 mm should be made with a push stick keeping your hands well clear of the blade.
- Keep the blade guard in place when making through cuts on the table saw. Remove it only when absolutely necessary (such as for dado cuts) and replace it immediately after.
- Don't force a binding cut — if the sheet starts to pinch the blade mid-cut, stop the saw, wedge the kerf open gently, and investigate the cause before continuing. Forcing through a pinch risks kickback.
- Wear eye and ear protection on every cut — solo work means no one to alert you to falling debris or call for help if something goes wrong. PPE is more critical, not less, when you're alone.
- Secure offcuts immediately — small offcuts falling from the table saw are a trip hazard. Keep a bin or shelf within arm's reach of the outfeed side to place offcuts as they come off the saw.
How a Cutting Plan Makes Solo Work Easier
Solo plywood cutting requires more mental bandwidth than working with a partner, because you're simultaneously managing the material, operating the tool, monitoring the cut line, and thinking about the next step. Anything that reduces cognitive load at the saw makes solo work both safer and more accurate.
A detailed cutting plan — generated by the Cut Optimizer app from your parts list — eliminates the need to think about what to cut next. Every decision about cutting order, dimensions, and sheet assignment has already been made before you switch on the saw. You follow the guide one step at a time: set the fence, make the cut, label the piece, move to the next step. This sequential, decision-free workflow is what separates a controlled, efficient solo cutting session from one that's constantly interrupted by re-measurement, re-planning, and backtracking.
✅ Verdict: The most effective approach for solo full-sheet plywood cutting is: track saw (or circular saw with guide) on foam for rough breakdown, table saw for precision trimming, and a step-by-step cutting plan prepared in advance. The cutting plan is arguably the most important element — it removes in-session decision-making from a process that already demands full physical attention. Generate yours before the session, not during it.
Tool Comparison for Solo Plywood Breakdown
| Tool | Solo Suitability | Accuracy | Best Use |
|---|---|---|---|
| Track saw on foam | Excellent | Very high | Full-sheet breakdown and finish cuts |
| Circular saw + guide | Very good | High (with care) | Rough breakdown; budget setup |
| Table saw + outfeed support | Good (with setup) | Highest | Precision rips on managed-size pieces |
| Lumber yard panel saw | Excellent | Medium (oversize only) | Initial breakdown; no-workshop scenarios |
| Table saw (no support) | Not recommended | Poor | Avoid for full sheets solo |
📱 Go Into Your Solo Cutting Session Fully Prepared
Cut Optimizer generates a step-by-step cutting guide for every sheet in your project — the exact sequence of rip cuts and crosscuts to follow from full sheet to finished parts. Know every measurement before you switch on the saw. Available free for iPhone and iPad.
Frequently Asked Questions
What is the easiest way to cut a full sheet of plywood by yourself?
The easiest solo method is a track saw on two sheets of rigid foam insulation laid on the floor. The plywood sits completely flat and supported, the guide rail clamps directly to the sheet for a perfectly straight cut, and there's no outfeed support challenge because the material never needs to be lifted or fed through a machine. A track saw on foam handles both rough breakdown and finish-quality cuts in the same setup, making it the most versatile and solo-friendly option available.
Can I cut full plywood sheets on a table saw by myself?
Yes, but only safely with adequate support on all sides of the blade. Full sheets extend well beyond the table on both infeed and outfeed sides — without roller stands or a fixed outfeed table at the correct height, the sheet tips and binds. The recommended approach for solo table saw work is to use a track saw or circular saw to break the sheet into manageable sections first, then trim those sections to final dimensions on the table saw. This two-stage approach is both safer and more accurate than attempting to run a full sheet through the table saw alone.
What can I use instead of a track saw to cut plywood alone?
A circular saw guided by a clamped straightedge or a purpose-made shooting board produces results close to a track saw when set up correctly. The key steps are measuring the offset between your saw's blade and baseplate edge, marking a parallel guide line offset by that measurement, and clamping a straight piece of MDF or aluminium extrusion firmly at both ends as the fence. Cut with the sheet face-down on foam insulation to prevent tear-out on the visible surface. This setup costs almost nothing if you already own a circular saw and produces accurate, repeatable cuts with practice.
How do I transport full sheets of plywood to my workshop alone?
For car transport, use a roof rack with foam padding and ratchet straps to carry sheets horizontally, or fold down rear seats and slide sheets in diagonally in a van or SUV. If the sheets won't fit, ask the lumber yard to make two or three rough breakdown cuts when you buy them — most yards offer this for a small charge per cut. This is where having a cut list optimizer prepared in advance is especially useful: you can give the yard operator the exact rough dimensions you need and they'll cut to order while you're there.
How do I prevent tear-out when cutting plywood alone?
Tear-out on plywood face veneer is caused by the saw blade's teeth tearing upward through the veneer fibres on the exit side of the cut. For circular saws (which cut on the upstroke), place the sheet face-down so tear-out occurs on the hidden back face. For track saws with a scoring facility, the scorer creates a clean groove ahead of the main blade, eliminating tear-out on the top face regardless of orientation. Using a fine-tooth blade (60+ teeth for a 160 mm track saw blade, 80 teeth for a 10" table saw blade) also significantly reduces tear-out on both faces.
Does having a cutting plan actually help when cutting plywood alone?
Significantly, yes. Solo plywood cutting requires managing both the physical handling of large material and the mental tracking of what to cut next, what dimensions are needed, and which piece is which. A step-by-step cutting plan from a cut list optimizer app eliminates all the mental work: every cut is pre-planned, sequenced in the optimal order, and presented one step at a time. You simply follow the guide at the saw without needing to consult a tape measure, re-check your drawings, or make on-the-fly decisions — which is precisely when mistakes happen when you're working alone.
how to cut full sheet plywood alonesolo plywood cutting table sawtrack saw plywood breakdown solocircular saw plywood guide railcut plywood by yourself safelyoutfeed support table saw plywoodlumber yard plywood cutting servicestep by step plywood cutting plan